


A refrigerator is an essential appliance in the household to preserve food and other organic products. Therefore, it’s important to understand the basics of refrigerator troubleshooting in case of any emergencies. These little tidbits can save you a lot in repairs and damages in the long run.
Refrigerators are long-term investments that provide a valuable service for decades when properly maintained. This article will teach you how to troubleshoot a refrigerator, transforming you into a DIY king of your cooling box. With the refrigerator troubleshooting guidelines in this blog, you can guarantee the longevity of your icebox.
Furthermore, in this article, you’ll learn how to diagnose a faulty refrigerator. You’ll also learn and understand the various components within the fridge and their respective functionalities.
Understanding the Various Functioning Parts of a Refrigerator
Refrigerator troubleshooting is easier with understanding a refrigeration system’s components and their functions. Hence, by getting acquainted with the respective components, you can predict whatever issues your refrigerator may be going through quickly.
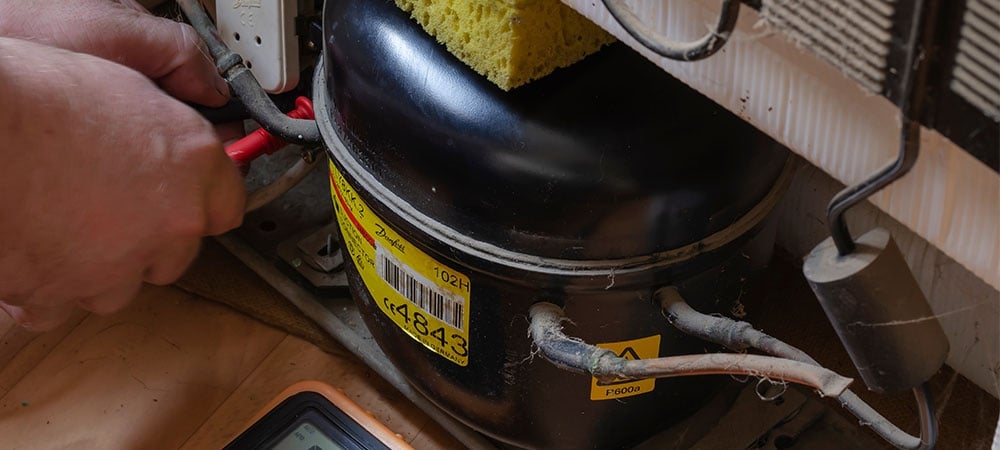
- The Compressor: This is the core engine of the refrigerator. It kick-starts the whole refrigeration process by pumping the coolant throughout the system. It also regulates the pressure and temperature and ensures optimum functionality. The compressor is typically found at the base of the refrigerator.
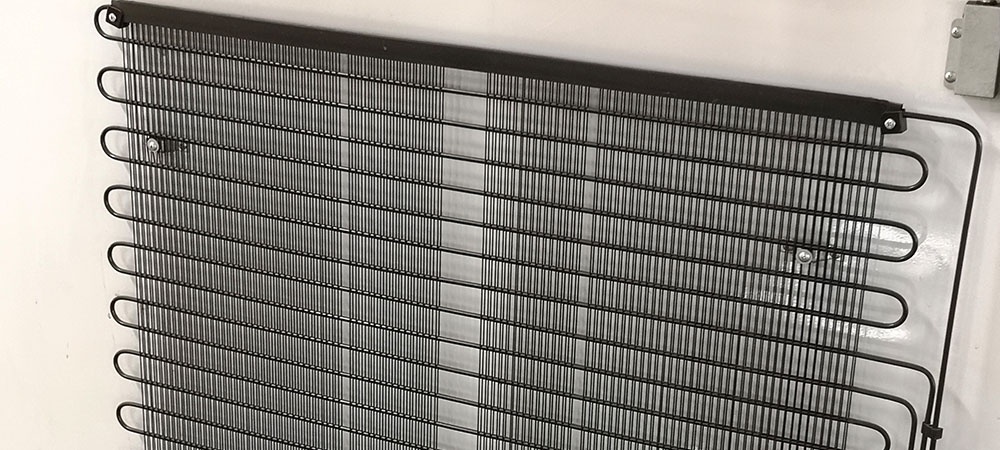
- Condenser Coils: These are pipes that run behind the refrigerator. They condense the refrigerant from its vapour form as it passes through. This process gives off heat which you can feel emanating from the back of the refrigerator. As your refrigerator troubleshooting guide, we advise you to clean and brush your condenser coils at least every 2 to 3 months.
- Expansion Device: The refrigerant is liquid from the condenser coils as it approaches the expansion device. However, the job of the expansion device is to convert the refrigerant liquid back to vapour. This action aims to control the release of pressure within the system.
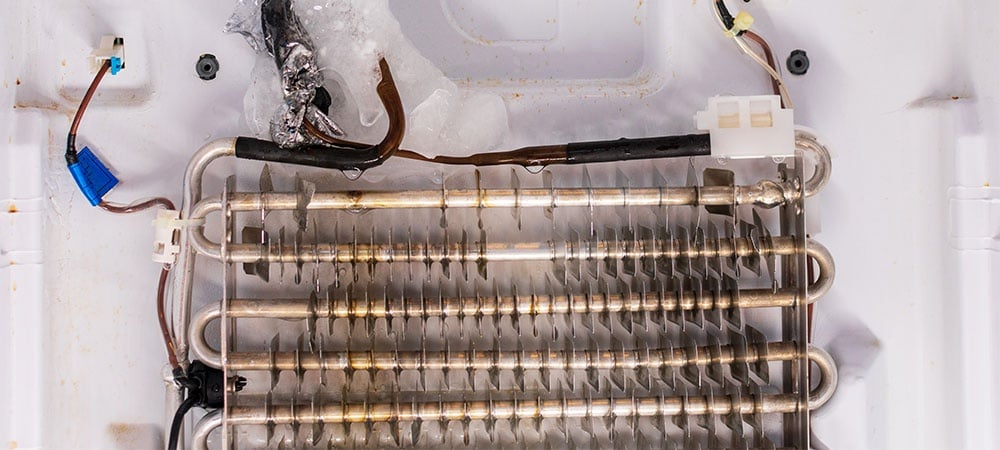
- Evaporator Coils: This is where the central cooling takes place. As the now liquid coolant passes through these coils, they absorb any surrounding heat within the refrigerator, usually from the food compartment. You can find the evaporator coils behind the freezer.
Related Article: Top Reasons Why Your Refrigerator Isn’t Cool
Refrigerator Troubleshooting Problems You May Encounter
In this refrigerator troubleshooting guide, you’ll learn a thing or two on how to spot imminent issues before they escalate.
Malfunctioning Thermostat
A thermostat is an essential part of the refrigerator that controls the temperature flow within the icebox. A faulty thermostat can be a significant reason for your refrigerator not cooling or overcooling.
Think of the thermostat as the autonomous system in the human body. It regulates the flow of temperature throughout the refrigerator and ensures that the freezer doesn’t melt away or cause the refrigerator to over freeze.
A quick refrigerator troubleshooting tactic for diagnosing the thermostat is through a multimeter. A multimeter can detect the lack of consistency in a thermostat by listening for clicks. If you hear a click, the thermostat is still in good condition. However, if you hear a click, it’s likely faulty. This is a common refrigerator problem that a professional can rectify.
Persistent Cycling
Another issue that refrigerator troubleshooting can solve is repeated cycling of the refrigerator. If you notice your refrigerator cycling on and off rapidly, the fan blades may be dusty, and the condenser coils may be dirty.
These dirty components pose a severe threat to your refrigerator’s smooth operation. Once you notice this, all you have to do is turn off the main switch and remove the rear access panels.
Furthermore, carefully dust the condenser coils and vacuum the fan blades to remove all the dirt and debris. Next, place a lightweight material over the coils and fans before covering them with the rear access panel. This material will reduce the build-up of dust next time. This relatively easy fix can solve the problem of your refrigerator not cooling.
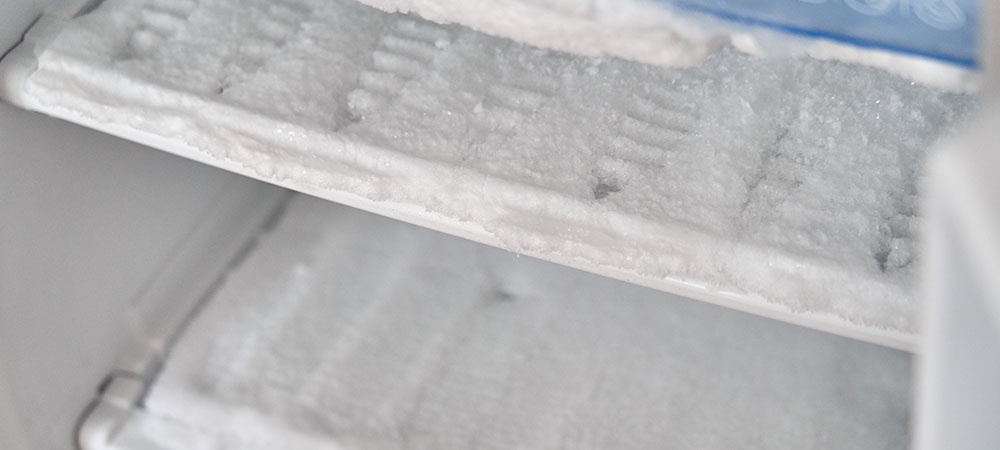
Ice Build Up
This issue is another vital part of learning how to troubleshoot a refrigerator. Ice and frost build-up can be detrimental to your refrigerator’s operation, leading to clogging and obstruction.
A major cause of ice build-up is an opening in the freezer that prevents the door from sealing shut. Your freezer needs an airtight seal that creates a vacuum once you close its door.
However, warm air can flow into the freezer and condense if the freezer door doesn’t close totally and has space. This warm air freezes and turns into blocks or ice sheets that can clog up the freezer.
Once you notice this and want to begin refrigerator troubleshooting the issue, ensure that you look for any gaps and leaks in the freezer door. Once you notice the faulty freezer door, you can either replace it or correct its placement. Either way ensures the freezer door can close and seal tight without gaps.
Conversely, the freezer door may be fine, but the hinges may be faulty, creating gaps for warm air to enter. In this instance, a great DIY refrigerator repair move will be to unscrew the hinges and screw them back. Furthermore, you can apply lubricants to the stiff hinges to ensure they are mobile once more.
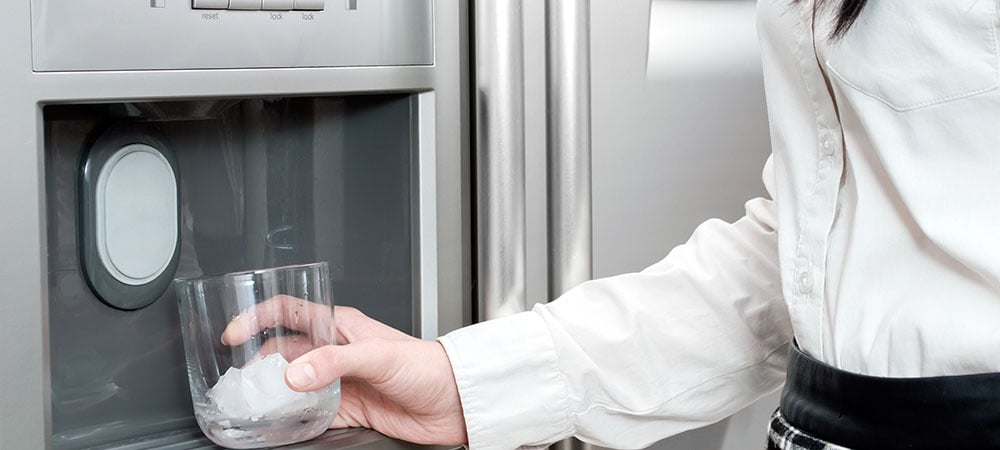
Overflowing Ice Maker
The freezer component of your refrigerator requires attention frequently. A faulty freezer can contribute to the refrigerator not working correctly. A common malfunction can be the overflowing of the ice maker unit of the freezer in the refrigerator.
This issue typically occurs when there is low pressure from the water inlet valve. Reduced pressure will cause the water to leak into the ice unit, leading the ice maker to overflow. If the ice maker overflows, it can reduce the refrigerator’s efficiency by either preventing the freezer door from closing properly or offsetting the device’s inner temperature.
You can prevent this overflow problem by checking the water pressure and ensuring it stays at least 20 psi. As far as refrigerator troubleshooting goes, if the ice maker still overflows at sufficient water pressure, the water inlet valve may be defective. Hence, you need to change the valve as soon as possible.
Loud Noise During Operation
Another common problem we must mention in this refrigerator troubleshooting guide is noise. Your refrigerator may begin to make loud and rattling noises as it operates. Once you hear any loud noise, simply turn off the fridge from the power source.
Next, remove the rear access panel and inspect the fan motors for any obstructions or debris. If you notice any visible damage or significant wear and tear on the fan blades, you may need to replace them.
And in instances where the noise seems to be coming from within the refrigerator, you need to inspect the evaporator fan motor. This piece of equipment is in the freezer, and it draws air into the evaporator coils.
Therefore, check for any damage or excessive signs of wear and tear. For example, if the fan blade makes a squeaking sound while rotating on its axle, it needs lubrication.
Water Leakage
Water leakage is a frequent occurrence with household refrigerators. There are a myriad of reasons for this leakage. When diagnosing your faulty refrigerator, it’s crucial to act fast to detect the source of the problem.
A leaky refrigerator can pose a fall hazard for you or anyone in your home. Furthermore, it poses a shock risk if the pool of water flows to an electricity source. Also, the leakage will reduce the efficiency of the refrigerator over time.
Firstly, you need to check the device’s defrost drain and confirm there is no blockage. Blockages can occur due to debris or food particles. Secondly, once you spot a blockage at the defrost drain, make sure to drain the hole with warm water. You can also use a long and thin piece of rod to push out the debris.
The blockage may come from the water supply, leading to leakage from the pipe pooling onto the floor. Troubleshoot this issue by turning off the device and finding the inlet valve behind the fridge.
Next, check the shut-off valve and inspect the plastic tubing for cracks. Proceed to replace the water supply pipe if you notice any damage. An essential point in DIY refrigerator repair is early notice. Once you spot a small pool of water, inspect the tubing of your refrigerator immediately.
Malfunctioning Compressor
The compressor is the beating heart of your refrigerator. However, its malfunction is one of the most common refrigerator problems due to its internal nature. The compressor is responsible for the cycling of refrigeration within the machine. It compresses the coolant and passes it through the condenser coils and the evaporator.
Once this vital machinery is faulty, the refrigerator may perform abysmally or even stop functioning totally. Therefore, if you detect a significantly low performance in your refrigerator, proceed to inspect the compressor.
Ultimately, you need to check for dirt around the compressor and dust off any debris or clutter. Also, you’ll need to lubricate the compressor to keep it from overheating, thus ensuring the device’s durability.
However, if your DIY attempts do not fix the immediate problem, you can reach out to us for quality refrigerator repair services to get a complete diagnosis of the problem. We are only a call away and ready to provide optimum refrigeration care.
Refrigerator Internal Care
Furthermore, it’s essential to note that refrigerator problems aren’t exclusive to outer components, as you can see above. Therefore, you need to consider additional precautions while maintaining your refrigerator, especially when caring for the inner compartments.
It’s especially important to be wary of the food products you store in your refrigerator. This precaution is important to preventing odour buildup in your refrigerator. Additionally, you need to pay attention to internal spillages and stains inside the fridge. These stains can harden, producing a foul odour.
When DIY Fails, Seek Professional Help
While refrigerator troubleshooting can be helpful in some cases, there are instances where the situation may appear more dire than usual. In these cases, once your DIY efforts aren’t bearing fruits, it’s time to seek professional help.
However, we shall highlight certain instances where professional help may be necessary to complement your DIY efforts. We provide premium refrigerator repair services at your beck and call. Below are some of the situations that lend themselves to our intervention.
- Greasy residue at the base of the freezer
- Persistent hissing noise
- Fractured condenser coils
- Unknown source of water leakage
- Infrequent cycling of refrigeration after cleaning condensers
- Consistently tripping refrigerator breaker
If you experience any of the above faults, even after implementing this refrigerator troubleshooting guide, do not hesitate to give us a call. Our expert refrigerator techs will be available to handle the necessary repairs.
Related Article: How to Fix Your Fridge Leaking Water Problem

Final Thoughts
Refrigeration maintenance is vital to ensuring your refrigerator’s prolonged usage and efficiency. And above, we’ve broken down some of the refrigerator troubleshooting steps that can help you.
Lastly, it’s important to remember that DIY refrigerator repair can only take you so far. It’s possible to come up against faults that are beyond your DIY refrigerator troubleshooting skills.
In this instance, our same-day refrigerator repair services at Prime Appliance Repair need to be your first thought. Our refrigerator technicians will diagnose the fault and get your device working optimally the same day you call us.

